
Key Takeaways
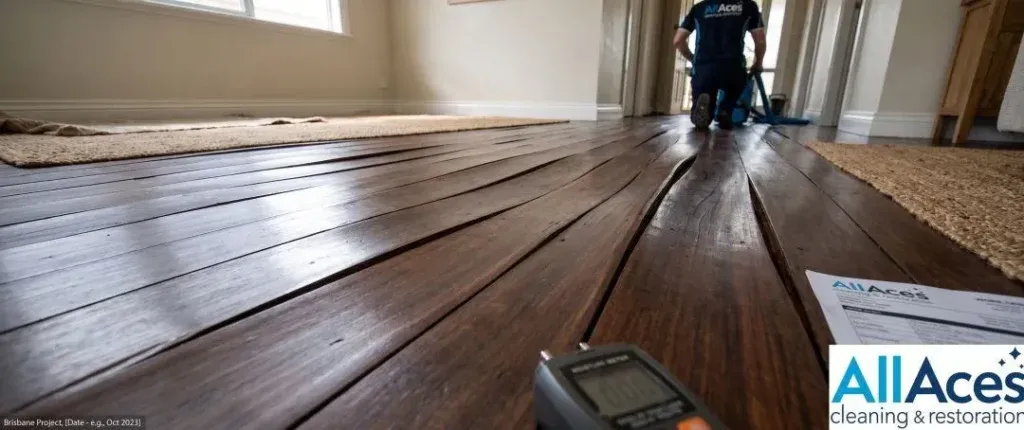
- Speed beats technique Timber wet for more than 24–48 hours is far more likely to cup, buckle or need board replacement.
- Cupping is usually recoverable. Buckling and delamination often aren't. The damage type tells you how urgent and how serious the situation is.
- A wet floor can look dry and still fail. Surface moisture disappears in hours; the wood itself can take 7 to 10 days or longer to reach a safe moisture content, which is why professionals measure it rather than guess.
- The type of water changes the whole job. Clean water (Category 1) is a very different job to grey water or sewage-contaminated black water (Category 3).
- Mould doesn't wait for you to finish drying. Visible growth can start within 48 hours in Australia's warmer, humid regions, so drying and hygiene run in parallel, not one after the other.
- Home insurance often covers water damage but not flood unless you've specifically got flood cover, so check your policy before you assume anything.
Water category changes the job
Clean water, grey water and black water each demand a different drying and hygiene protocol.
Mould doesn't wait
Visible growth can start within 48 hours in Australia's humid regions. Drying and hygiene run in parallel.
Flood cover isn't automatic
Home insurance often covers burst pipes but treats external flood as a separate, sometimes optional, category.
A water-damaged timber floor is a race against the wood itself. Timber is hygroscopic: it constantly absorbs and releases moisture to stay in balance with the humidity around it.
When a floor floods, a pipe bursts, or an appliance leaks unnoticed for days, the boards take on far more water than that natural balance allows. The wood grain swells, the fibres expand unevenly, and a chain of damage begins that gets harder to reverse the longer it runs.
This guide covers how to read the damage, dry the floor correctly, and know when a DIY fix genuinely won’t cut it, drawing on the same restoration standards AllAces technicians use on flooded homes across Brisbane, Sydney and Melbourne.
Solid, Engineered or Floating: How Each Reacts to Water
Solid Hardwood
One solid piece of timber per board, so it cups quickly — but a caught-early floor can often be sanded back to a clean, flat surface once fully dry.
Engineered Wood
A thin timber veneer bonded over plywood-style backing. Once water passes the top layer, adhesive degradation and delamination are common — and rarely repairable.
Floating & Laminate
Tongue and groove planks aren't fixed to the subfloor, so water travels further and faster underneath before anyone notices.
Whichever type you’ve got, the subfloor matters as much as the visible boards. A saturated wooden subfloor or plywood subfloor holds moisture long after the surface looks dry — professional drying always checks below the boards, not just on top of them.
How to Read the Damage
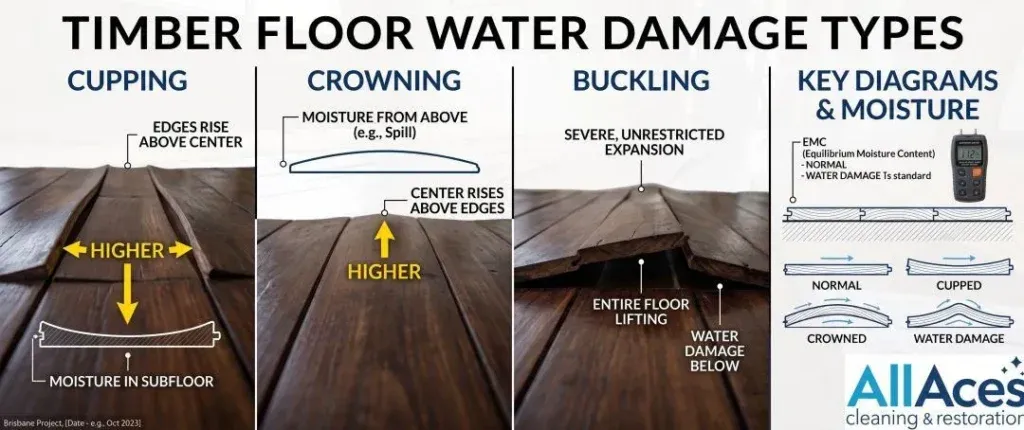
Cupping — usually recoverable
Plank edges rise higher than the centre, giving a washboard look. Usually the earliest visible sign of moisture imbalance, and the most likely to flatten once dried properly.
Crowning — watch closely
The opposite of cupping: the centre sits higher than the edges. Often appears after a cupped floor was dried or sanded too aggressively while still wet underneath.
Buckling — structural
Whole sections lift away from the subfloor, sometimes by several centimetres. Fasteners or adhesive have failed — this needs structural drying, not a fan and an open window.
Warping & Splitting — progressive
Boards twist or crack as the wood dries unevenly, with nails lifting (fastener pullout). Left unmanaged, it tends toward wood fibre rot in the boards and joists beneath.
Delamination — often unrepairable
Layers of an engineered board separate from each other. Once delaminated, a board is replaced, not restored.
Reading the moisture, not just the look: a board can look dry and still hold dangerous moisture content (MC). Technicians use a pinless moisture meter to check MC against the floor’s equilibrium moisture content (EMC), track relative humidity (RH), and sometimes use thermal imaging to map water migration under boards that look untouched — a process called moisture mapping.
Category 1, 2 or 3? Why the Water Type Changes Everything
| Category | Typical source | Risk level | What it means for the job |
|---|---|---|---|
| CAT 1Clean water | Burst supply pipe, overflowing sink | Low contamination | Still needs fast extraction and drying, no biohazard handling |
| CAT 2Grey water | Washing machine or dishwasher overflow | Moderate | Requires more careful hygiene handling during drying |
| CAT 3Black water | Sewage backup, external flood, stagnant water | Biohazard | Flooring is far more likely to need full removal, not drying |
The category isn’t just a technical label. It determines whether antimicrobial treatment and disinfection are needed before drying starts, and it’s usually the first thing a restoration technician or insurance assessor asks about.
Drying a Water-Damaged Timber Floor, Step by Step

Rapid water extraction
Standing water comes out first, a wet/dry shop vac for small areas, a commercial water extraction machine for anything larger. Every hour water sits on timber adds to the damage.
Strip the finish where needed
Polyurethane finish or old hardwood wax seals moisture in as much as out. Finish stripping opens the wood grain so trapped moisture can actually escape.
Set up structural drying equipment
High-velocity air movers or an axial fan for airflow, paired with an LGR or desiccant dehumidifier to pull moisture from the air. Floor drying mat systems extract moisture directly from beneath the boards via vacuum pressure.
Tent stubborn areas
A floor tenting technique using tarps and vacuum pressure focuses drying power on badly saturated sections without over-drying the rest of the room.
Let the wood stabilise gradually
Rushing this step causes the cracking and splitting that turns a repairable floor into a replacement job. A proper equalisation period lets the timber reach an even moisture content throughout the board.
Confirm before you refinish
A moisture meter reading against the floor's normal EMC is the only reliable way to know acclimatisation is complete and the floor is ready for sanding or recoating.
If the water event involved Category 2 or 3 water, add air scrubbers, negative air machines and HEPA filtration to the setup, and expect an antimicrobial treatment pass before the space is closed back up.
DIY Fixes vs. Professional Structural Drying
| Situation | Typical approach | Pros | Cons |
|---|---|---|---|
| A cup of water, caught in minutes | Blot dry, open windows, run a fan | Free, immediate | Only works if caught almost instantly |
| Moderate spill or short-term leak | Domestic dehumidifier, box fans, wet/dry vac | Low cost, some control | Rarely reaches the subfloor; slow, uneven drying |
| Cupping, buckling or room-scale flood | Structural drying: LGR dehumidifiers, air movers, moisture mapping, drying mats | Reaches the subfloor, moisture-verified, insurance-ready documentation | Requires a licensed technician |
| Category 3 (black water) or sewage | Professional biohazard-standard remediation | Only safe, compliant option | Not a DIY situation, under any circumstances |
The pattern holds up in practice: a domestic extraction unit only ever removes water from the top layer of a floor — the same limitation AllAces flags for carpets after water damage. Timber is less forgiving than carpet: a board that dries unevenly cups or splits instead of just smelling musty.
How Long Does It Actually Take?
minimum structural drying time
window before cupping typically sets in
before visible mould can begin in humid regions
Surface water disappears within hours. The timber itself needs far longer: most water-damaged floors need 7 to 10 days minimum of continuous structural drying to reach a safe moisture content, and larger floods push that out further. Humidity matters too, a floor drying in a Brisbane wet season faces a tougher fight than the same floor in a dry Melbourne winter, which is why professional jobs run dehumidifiers around the clock rather than relying on open windows.
Stopping early because the surface looks dry is one of the most common mistakes homeowners make, and usually what causes cupping or mould to show up two or three weeks after everyone thought the problem was solved.
Can the Floor Be Saved, or Does It Need Replacing?
Usually salvageable
Cupping within 24–48 hours, isolated exposure, boards still flat and fastened. A proper dry-out plus sanding and recoating often restores close to original condition.
Often partial replacement
Buckling, visible delamination, or fastener pullout in specific sections. Spot plank replacement can fix these without redoing the whole floor.
Usually full replacement
Category 3 water, wood fibre rot, or joist saturation beneath the floor. A structural integrity inspection should happen before any talk of new flooring.
A qualified technician makes this call with a moisture meter and a proper salvageability assessment, not a visual guess, one reason DIY drying can end up costing more than calling a professional from day one.
The Mould Risk Nobody Talks About Enough
Drying the floor and preventing mould aren’t two separate jobs. They’re the same job.
Mould only grows where there’s sustained moisture, and can trigger nasal congestion, coughing and wheezing, with greater risk for people with asthma, allergies or a compromised immune system.
Better Health Channel, Victorian Government — Mould and Your Health
By the time mould is visible, it’s already established enough to require proper remediation, not just a wipe-down.
Victorian Building Authority — Water Damage & Mould Risk in Buildings
Subfloor mildew is particularly sneaky because it develops somewhere nobody’s looking. Watch for a musty odour that doesn’t clear after a few days of fans running, that’s usually mould spore activity starting under the boards, and the trigger point for antimicrobial treatment and containment before it spreads into wall cavities or affects indoor air quality more broadly.
Insurance, Cost and What to Expect
Most Australian home insurance policies cover sudden water damage, like a burst pipe, but treat flood (water entering from outside due to rain, storm surge or a rising waterway) as a separate category that isn’t always included by default.
Flood cover in home policies varies between automatic inclusion, opt-in, opt-out and full exclusion, so it’s worth reading your policy before an event happens, not after.
Insurance Council of Australia — Flood Insurance Explained
Documentation earns its keep here. A structural drying certificate from a licensed restoration company, backed by dated moisture readings, is exactly what most insurers ask for before approving a property damage claim involving timber flooring. AllAces publishes indicative cost ranges on its pricing page for this reason, knowing roughly what a job costs helps homeowners make faster, calmer decisions during an already stressful week.
Given how La Niña conditions have already increased flood exposure for parts of eastern Australia in recent seasons, checking your flood cover before the next wet season isn’t a bad way to spend twenty minutes.
After Drying: Sanding, Refinishing and Repairs
Once moisture readings confirm the floor has reached a safe, even level throughout, the cosmetic work can begin.
Solid hardwood usually gets a full sand back to bare timber, followed by fresh polyurethane finish or compatible hardwood wax. Engineered floors have a thinner wear layer, so recoating or a light sand is often preferable to a full strip-back, a specialist can confirm how much veneer is left to work with.
Where individual boards were damaged beyond saving, spot plank replacement and wood stain touch-up let a technician blend new timber into the existing floor. Any boards that lifted during buckling need re-nailing before refinishing, and it’s worth a final structural integrity inspection to confirm nothing was missed underneath.
Why Australians Call AllAces for Wood Floor Water Damage
Timber floor drying isn’t a job for guesswork, and “it looks dry” is never good enough evidence to stop. AllAces technicians work to the IICRC S500, the global reference standard for professional water damage restoration, using the same moisture-mapping and structural drying protocol described throughout this guide.
Water Damage Restoration
Full structural drying for floors, subfloors, walls and contents. 24/7 across Brisbane, Sydney and Melbourne.
Flood Damage Restoration
For Category 3 water events involving external flooding, storm surge or sewage backup.
Mould Removal & Remediation
For subfloor mildew or black mould that's already taken hold before drying began.
● IICRC & RIA member association ● Meet the restoration team ● 24/7 emergency response, QLD / NSW / VIC
Frequently Asked Questions
How long does it take for a wood floor to dry after water damage?
Surface moisture clears within hours, but the timber itself typically needs 7 to 10 days of continuous structural drying to reach a safe moisture content, and more extensive flooding can take longer. Stopping early because the floor looks dry is the most common cause of delayed cupping or mould.
Can a cupped or buckled timber floor be saved?
Cupping caught within 24 to 48 hours is usually recoverable through proper drying and sanding. Buckling, delamination or joist saturation more often need spot plank replacement or a full structural assessment before any repair is possible.
Should I remove the polyurethane finish before drying a wet timber floor?
Often, yes. Polyurethane finish and old floor wax seal moisture into the board, so stripping the finish lets trapped water evaporate properly. A restoration technician will assess this case by case, since removing finish unnecessarily adds cost and time.
What's the difference between a domestic dehumidifier and professional drying equipment?
A domestic dehumidifier manages room humidity but doesn’t reach moisture trapped under boards or in the subfloor. Professional setups combine LGR or desiccant dehumidifiers, high-velocity air movers and moisture mapping to dry the floor from the inside out, not just the air above it.
How do I know if water damage has caused mould under my floor?
A musty odour that persists after a few days of drying is the clearest early sign, often before any visible growth appears. According to Better Health Channel, mould develops wherever moisture sits long enough, which is why subfloor checks matter even when the surface looks fine.
Does home insurance cover water-damaged timber floors in Australia?
Sudden internal water damage, like a burst pipe, is usually covered under standard home insurance. Flood damage from external water is often a separate, sometimes optional, category of cover, so it’s worth checking your specific policy with your insurer before assuming either way.
Timber floors give you a narrow window to get the drying right. Catch cupping early, measure moisture rather than guess at it, and treat mould prevention as part of the drying process, not an afterthought. When the water involved sewage, flooding, or a whole room, that’s the point to bring in a licensed structural drying team rather than a fan and an open window.
To learn more about the service locations:
Water & Flood Damage Restoration Brisbane
Water & Flood Damage Restoration Sydney